I've seen it said, a couple places on the internet1, that when you mow the lawn you should cut off no more than one-third the length of the grass. So for example, if you mow when the grass is 3 inches tall and you cut it down to two inches, you cut off one-third of the original length.
Yeah. But a lot of my lawn is in a low, wet area, and it grows as much as an inch a day. So I cut my lawn to two inches tall, and the next day it's three inches tall and ready to be cut again.
To follow that "cut off no more than one-third" rule, I'd have to mow my lawn every day!
Note:
1 -- It might have been one place on the internet, which I found more than once. Can't rightly say.
Sunday, July 7, 2019

Tuesday, June 18, 2019
Documenting differences in QC fittings: True Value and Harbor Freight

Based on one set of each brand. Hopefully these differences are consistent.
Sunday, June 9, 2019
Preferences: Shut-offs
| This isn't bad, because I can tell that the water is on. Both valve handles are in line with the water path, so both outlets are on. If the handles were crossways the water would be off. I can tell at a glance. Are those screws rusty? |  |
This isn't good, because I can't tell at a glance if the water is on or off. Similar to the connector above, but the valve handle doesn't indicate "in-line" or "crossways". |  |
This is better. Instead of a "valve handle" this shut-off has what the packaging calls a "large easy to use knob". I like it. I know the water is turned on because the knob's grabber is in-line with the water path. Turned 90 degrees -- crossways -- the water would be off. |  |
This one also: I can tell from the position of the knob whether the water is on or off. I find this type much easier to use, this and the one before this, easier to use than the first two shown above. Maybe because the handle is more accessible. Maybe because pressure is applied on both sides of the pivot screw when I open or close the valve. Both those things, I think. |  |
Same story here. Hey... I wonder if the knob would fit on those first two fittings... or on other fittings that give me grief. Hmm... |  |
Wednesday, June 5, 2019
The latest (and greatest!) in multi-language labeling
Lookin for some "soaker hoses" to help me water my landscape & garden plants. I found a good one at Northern Tool. Below the image of the hose they ask: "What do you think of our product images?" Kind of an odd question, no? So I looked at the blowup of the package:
 I'm too old to think highly of the multi-language product labeling that is so common nowadays. But this Gilmour label is certainly one I can live with.

Friday, April 26, 2019
Dethatcher with Achilles wheel
Couple years back a friend told me a "dethatcher" might be good to use on the lawn once in a while.
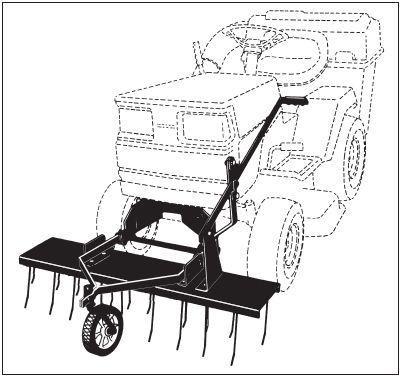
My tractor's a Husqvarna. They offer two different dethatcher models: front-mounted, and rear-mounted, made by Agri-Fab. The rear mount didn't make sense to me as I figured I'd dethatch and mow and bag the clippings all in one operation. The bagger occupies the rear, so the dethatcher has to go in front.
So that was my plan. But it turns out the front-mount dethatcher costs about $200 more than the rear-mount one. Nice, huh? Well, you know I struggled with that decision, then went ahead and spent the extra money for the front mount model. I got the thing during the winter so I'd be all ready for Spring.
//
Spring came at last. I used the thing once, for maybe an hour. Hit a soft spot in the lawn. The wheel and the dethatcher tines sunk in the mud, and before I could stop the tractor, it rolled up on top of the dethatcher. The cheap plastic wheel couldn't take the tractor weight. Bent the wheel so bad it had to be replaced.
To buy a new one was $40 -- for a plastic wheel that's practically worthless. I so I spent the rest of dethatcher season shopping for a 7-inch wheel.
The 7-inch wheel is a common size. But this one takes a 5/8" axle, unusually large for a 7" wheel. And apparently the only one manufactured, in this solar system, is the $40 one. Eventually I broke down and bought the damn wheel. I installed it and put the dethatcher away, ready for Spring.
//
Spring came again this year. I put the dethatcher on and set to work. I have to say, the bagger catches a nice mix of dead grass and powdery soil, and I love adding that to my compost pile. It'll give me some impressive volume, too, if I can ever get the whole yard done.
But it is slow going, because I don't want to buy another flimsy $40 wheel.
//
Well, it was good for maybe an hour before the thing got stuck in mud and the tractor climbed on top of it again. And I was crawling slow. Damn tractor only has to go a few inches after the dethatcher gets stuck, and that's all she wrote. This time, though, I had an idea.
With the 7" wheel installed on the funny bent axle, I had a little over half an inch clearance above the wheel. So an 8-inch wheel should fit. I went to Harbor Freight and looked a their 8 in. Solid Rubber Tire with Polyethylene Hub (item#61706). That's the one that says its maximum working load is 1100 lbs. It's an eight-dollar wheel. The first time I saw that "1100 lbs" I thought it was a typo for 100 or 110 lbs. Even so, if it can support 100 lbs, that's better than the original wheel without a doubt. And $8 instead of $40.
The wheel measures 73∕4" diameter at the tread face. Just under 8": a little forgiveness there; I may need it. It's a rubber tire on a plastic rim, but the rim is thick plastic, not paper-thin like the original wheel. I bought two.
The original wheel used about 11∕2" of the axle. The new wheel is about 2", 21∕8" wide at the axle. The axle doesn't provide that much room to fit the wheel on.
However... As you can see in the picture, surrounding the axle bore hole the hub is inset about 3∕8", which means the wheel occupies less axle space. There's an inset like that on both sides of the wheel, so the wheel only uses about 11∕4" of the axle. It'll work!
I put one of the original washers back on the axle, far as it would go. Then I put the Harbor Freight wheel on, far as it would go. It was stopped by the washer. I had about half an inch of axle sticking out past the inset.
The axle didn't come out past the wheel enough to install the hitch pin that keeps the wheel on. However... There was enough axle sticking out that I could get an axle cap nut on it. The brim of the axle cap is smaller than the inset diameter, so the cap nut goes on okay. And you should have seen how pleased I was with myself then!
//
I used the dethatcher the same day I fixed it. No problem. And I used it longer that day than all the time I had used it before. And the wheel is still good. And I was gaining confidence and going faster, so that dethatching my lawn may be a less endless task than I thought.
My tractor's a Husqvarna. They offer two different dethatcher models: front-mounted, and rear-mounted, made by Agri-Fab. The rear mount didn't make sense to me as I figured I'd dethatch and mow and bag the clippings all in one operation. The bagger occupies the rear, so the dethatcher has to go in front.
 |
| Image from the Agri-Fab Owners Manual |
//
Spring came at last. I used the thing once, for maybe an hour. Hit a soft spot in the lawn. The wheel and the dethatcher tines sunk in the mud, and before I could stop the tractor, it rolled up on top of the dethatcher. The cheap plastic wheel couldn't take the tractor weight. Bent the wheel so bad it had to be replaced.
To buy a new one was $40 -- for a plastic wheel that's practically worthless. I so I spent the rest of dethatcher season shopping for a 7-inch wheel.
The 7-inch wheel is a common size. But this one takes a 5/8" axle, unusually large for a 7" wheel. And apparently the only one manufactured, in this solar system, is the $40 one. Eventually I broke down and bought the damn wheel. I installed it and put the dethatcher away, ready for Spring.
//
Spring came again this year. I put the dethatcher on and set to work. I have to say, the bagger catches a nice mix of dead grass and powdery soil, and I love adding that to my compost pile. It'll give me some impressive volume, too, if I can ever get the whole yard done.
But it is slow going, because I don't want to buy another flimsy $40 wheel.
//
Well, it was good for maybe an hour before the thing got stuck in mud and the tractor climbed on top of it again. And I was crawling slow. Damn tractor only has to go a few inches after the dethatcher gets stuck, and that's all she wrote. This time, though, I had an idea.
 |  |  |
| Images from the Agri-Fab Owners Manual | ||
With the 7" wheel installed on the funny bent axle, I had a little over half an inch clearance above the wheel. So an 8-inch wheel should fit. I went to Harbor Freight and looked a their 8 in. Solid Rubber Tire with Polyethylene Hub (item#61706). That's the one that says its maximum working load is 1100 lbs. It's an eight-dollar wheel. The first time I saw that "1100 lbs" I thought it was a typo for 100 or 110 lbs. Even so, if it can support 100 lbs, that's better than the original wheel without a doubt. And $8 instead of $40.
The wheel measures 73∕4" diameter at the tread face. Just under 8": a little forgiveness there; I may need it. It's a rubber tire on a plastic rim, but the rim is thick plastic, not paper-thin like the original wheel. I bought two.
 |
| Harbor Freight #61706 |
However... As you can see in the picture, surrounding the axle bore hole the hub is inset about 3∕8", which means the wheel occupies less axle space. There's an inset like that on both sides of the wheel, so the wheel only uses about 11∕4" of the axle. It'll work!
I put one of the original washers back on the axle, far as it would go. Then I put the Harbor Freight wheel on, far as it would go. It was stopped by the washer. I had about half an inch of axle sticking out past the inset.
The axle didn't come out past the wheel enough to install the hitch pin that keeps the wheel on. However... There was enough axle sticking out that I could get an axle cap nut on it. The brim of the axle cap is smaller than the inset diameter, so the cap nut goes on okay. And you should have seen how pleased I was with myself then!
//
I used the dethatcher the same day I fixed it. No problem. And I used it longer that day than all the time I had used it before. And the wheel is still good. And I was gaining confidence and going faster, so that dethatching my lawn may be a less endless task than I thought.
Thursday, February 28, 2019
You bought a what?
I bought a used chipper shredder, good size, five horse, runs great, looks like this:
 Except I don't have a bag yet.
It's an old Craftsman. Apparently Sears made a million different models that all look the same. Mine still has the label on it, but the ink is faded and I can't read the model number.
It's hard as hell on my hands when I push branches into it. But I didn't buy it for branches. I bought it for cardboard.
Wife bought an "air convection fryer" the other day. Still in the box. The box is about 15" each way, a cube, single-layer cardboard. It came in a shipping box, corrugated cardboard, just big enough to hold the other box.
I cut the shipping box along the edges and cut the flaps off. The biggest piece is small enough to fit flat on the bottom of my utility sink. I plugged the drain, put a couple inches of water in the sink, and sunk the cardboard into it. [EDIT 26 April 2019: I'm no longer comfortable using the utility sink to soak cardboard. My impression is that the glue they use for making cardboard is a water-soluble glue. I started to worry about glue clogging the drain pipe. Dunno if it would, but I don't much like the risk.]
After a couple minutes I took out the cardboard one piece a time and rolled it up into a log. The logs came out about an inch in diameter, perfect for the shredder. I took an old coat hanger, cut off the hook, and cut the rest into four pieces each maybe 8 inches long. Bent each one to put a 1-inch hook on one end and a 2-inch Vee on the other.
I caught one of the cardboard logs in the Vee and hooked the hook on the old ClosetMaid shelving that's over the sink, to drip dry.
Needed one more coat hanger to hang up all my little cardboard logs. When the logs dry I'll set em aside, collect more, and run em through the chipper. Uh-oh.
Need a bag.

Update, 8 March 2019:
My cardboard logs were dry two days later. Maybe only one day, but I didn't check em.

[EDIT 26 April 2019: First of the hopper (big) instead of the chute (small) recently. Works great for the drop from hedge-trimming arborvitae and juniper landscape plants. Flat stuff slides in easy. So I'm thinkin about cutting my cardboard into flat pieces 6 or 8 inches wide instead of soaking and rolling em.]
The long ones (each from one 15"x15" square) are about 16" long and 1¼ (or so) diameter at the bulge near the middle. The short ones (each from two flaps) are 9 or 10 inches long and 1½ (or less) in diameter.
They take up a lot less space than the cardboard box did. Even after it was cut up. They'll go in the shredder better too.[EDIT The cardboard logs are WAY too short to hold onto after they're in the chute. Often, they jam the shredder and it runs slow for a minute and I just have to wait.]
Didn't shred em yet. Still need a bag.
Meanwhile... I keep them in a cardboard box!
Update, 12 March 2019:
Found some good-size burlap bags on amazon, four bags for $16, 24"x40" bags. No drawstring. (The bags with drawstrings are all way too small.)
I saw cheaper bags but they have a lighter shipping weight. I'm hoping more expensive and heavier shipping weight means heavier, stronger burlap.
Perimeter of the outflow opening from the shredder, about 34 inches. A bag 24" wide with a 1" hem, two sides @ 23", about 46" bag opening perimeter. A foot more than I need.
I'm thinkin to use a bungee cord to hold the bag in place. I can bunch up the extra burlap. Maybe I can bunch it up so it closes up any gaps due to shape of outlet.
If the bag slips out from under the bungee I'll fold over the burlap at the opening and hot glue 3" lengths of clothesline rope inside the fold, with 3" gaps between for bunching.
That's all I got.
[EDIT: The bag-and-bungee thing works great!]
Later, 12 March 2019:
Just finished rolling another batch of cardboard. Made hangers out of two more coat hangers. Everything's hangin up. [EDIT: Yeah, I'm gonna stop rolling cardboard, if wide flat strips go into the shredder easy.]
Apparently not all cardboard is created equal. The Amazon box that the 25-lb bag of dog food comes in seems to be thicker and tougher than the first box I rolled. In the photo you can see that the first ones were quite wrinkly. The Amazon dogfood box doesn't get wrinkly. They didn't want to stay rolled up, either. I soaked em for an extra half hour, and that helped. But it didn't help the first few I rolled today.
Couple days ago I rolled the thinwall box from a Schweppes 12-pack. That one was uncooperative. Didn't want to roll, and wouldn't stay rolled. I grabbed the cardboard tube from some paper towels and used the tube as a sleeve over the Schweppes roll. That worked! Gonna have to start saving those tubes now, too. PT and TP tubes, Jim calls em.
Oh, and the paper mache-lookin egg cartons that hold a dozen eggs? You don't need the shredder for them. Soak em, roll em, they fall apart. I threw them out. Think I'll try using egg cartons as seed trays this spring.
Hey, I'm retired. I have time for this. And when Christmas comes I'll be ready to turn all of those Amazon shipping boxes into garden mulch and worm food, I should live so long. Otherwise, I'll be the worm food.
Update, 13 March 2019:
The cardboard logs I rolled yesterday were dry enough this morning to take down and toss into my box of "ready-to-shred" cardboard. One-day drying.
To stop the "unrolling" while drying I can take another hanger and use the "vee" end to pinch and hold the log rolled up.
Update, 20 March 2019:
The days go by. It's a week since my last update!
I'm gonna have to be prepared to cut new cardboard boxes into flats right away when I get em. And soak-and-roll the flats into cardboard logs. So that cardboard doesn't pile up in the garage. And go down to the projects room every day to toss my drip-dried logs into the storage box.
When the storage box is full, it's time to drag the shredder out of the shed and run my cardboard logs thru it. [EDIT: Now I have the shredder, I have a reason to pick up twigs and stuff off the lawn. I'm keeping em in a big cardboard box in the shed. Gotta coordinate collection of shredables. A week or more often passes before I have enough stuff to drag out the shredder.
//
I did get some burlap bags. Didn't do anything with them yet. Oh, and the paper towel and toilet paper rolls I started saving do seem to add up quickly!
Our recycle bin now gets maybe 1/4 full in a week, instead of full full.
Later, 20 March 2019:
Oh, this is gonna work!
We have a river birch tree. River birches are always in the process of shedding bark. It's an interesting looking tree. But not only is it always shedding bark; it is also always losing branches. Not big ones, little ones: foot-long twigs, two foot, three foot at most, eh, maybe four. Half inch diameter or less. Nothing big.
But come the end of winter there can be a good lot of twiglets on the ground: under the tree, and beyond the tree in whatever direction a stiff wind was blowing. I spent an hour picking em up this morning. I got done, I evaluated the situation:
Not bad!
Sometimes it pulls the cardboard in too fast and can't handle it, and it wants to stall. But I find this doesn't happen if I run the briggs at full throttle. It'll be good if I can remember that.
It's an old Craftsman. Apparently Sears made a million different models that all look the same. Mine still has the label on it, but the ink is faded and I can't read the model number.
It's hard as hell on my hands when I push branches into it. But I didn't buy it for branches. I bought it for cardboard.
Wife bought an "air convection fryer" the other day. Still in the box. The box is about 15" each way, a cube, single-layer cardboard. It came in a shipping box, corrugated cardboard, just big enough to hold the other box.
I cut the shipping box along the edges and cut the flaps off. The biggest piece is small enough to fit flat on the bottom of my utility sink. I plugged the drain, put a couple inches of water in the sink, and sunk the cardboard into it. [EDIT 26 April 2019: I'm no longer comfortable using the utility sink to soak cardboard. My impression is that the glue they use for making cardboard is a water-soluble glue. I started to worry about glue clogging the drain pipe. Dunno if it would, but I don't much like the risk.]
After a couple minutes I took out the cardboard one piece a time and rolled it up into a log. The logs came out about an inch in diameter, perfect for the shredder. I took an old coat hanger, cut off the hook, and cut the rest into four pieces each maybe 8 inches long. Bent each one to put a 1-inch hook on one end and a 2-inch Vee on the other.
I caught one of the cardboard logs in the Vee and hooked the hook on the old ClosetMaid shelving that's over the sink, to drip dry.
Needed one more coat hanger to hang up all my little cardboard logs. When the logs dry I'll set em aside, collect more, and run em through the chipper. Uh-oh.
Need a bag.
Update, 8 March 2019:
My cardboard logs were dry two days later. Maybe only one day, but I didn't check em.
[EDIT 26 April 2019: First of the hopper (big) instead of the chute (small) recently. Works great for the drop from hedge-trimming arborvitae and juniper landscape plants. Flat stuff slides in easy. So I'm thinkin about cutting my cardboard into flat pieces 6 or 8 inches wide instead of soaking and rolling em.]
The long ones (each from one 15"x15" square) are about 16" long and 1¼ (or so) diameter at the bulge near the middle. The short ones (each from two flaps) are 9 or 10 inches long and 1½ (or less) in diameter.
They take up a lot less space than the cardboard box did. Even after it was cut up. They'll go in the shredder better too.[EDIT The cardboard logs are WAY too short to hold onto after they're in the chute. Often, they jam the shredder and it runs slow for a minute and I just have to wait.]
Didn't shred em yet. Still need a bag.
Meanwhile... I keep them in a cardboard box!
Update, 12 March 2019:
Found some good-size burlap bags on amazon, four bags for $16, 24"x40" bags. No drawstring. (The bags with drawstrings are all way too small.)
I saw cheaper bags but they have a lighter shipping weight. I'm hoping more expensive and heavier shipping weight means heavier, stronger burlap.
Perimeter of the outflow opening from the shredder, about 34 inches. A bag 24" wide with a 1" hem, two sides @ 23", about 46" bag opening perimeter. A foot more than I need.
I'm thinkin to use a bungee cord to hold the bag in place. I can bunch up the extra burlap. Maybe I can bunch it up so it closes up any gaps due to shape of outlet.
If the bag slips out from under the bungee I'll fold over the burlap at the opening and hot glue 3" lengths of clothesline rope inside the fold, with 3" gaps between for bunching.
That's all I got.
[EDIT: The bag-and-bungee thing works great!]
Later, 12 March 2019:
Just finished rolling another batch of cardboard. Made hangers out of two more coat hangers. Everything's hangin up. [EDIT: Yeah, I'm gonna stop rolling cardboard, if wide flat strips go into the shredder easy.]
Apparently not all cardboard is created equal. The Amazon box that the 25-lb bag of dog food comes in seems to be thicker and tougher than the first box I rolled. In the photo you can see that the first ones were quite wrinkly. The Amazon dogfood box doesn't get wrinkly. They didn't want to stay rolled up, either. I soaked em for an extra half hour, and that helped. But it didn't help the first few I rolled today.
Couple days ago I rolled the thinwall box from a Schweppes 12-pack. That one was uncooperative. Didn't want to roll, and wouldn't stay rolled. I grabbed the cardboard tube from some paper towels and used the tube as a sleeve over the Schweppes roll. That worked! Gonna have to start saving those tubes now, too. PT and TP tubes, Jim calls em.
Oh, and the paper mache-lookin egg cartons that hold a dozen eggs? You don't need the shredder for them. Soak em, roll em, they fall apart. I threw them out. Think I'll try using egg cartons as seed trays this spring.
Hey, I'm retired. I have time for this. And when Christmas comes I'll be ready to turn all of those Amazon shipping boxes into garden mulch and worm food, I should live so long. Otherwise, I'll be the worm food.
Update, 13 March 2019:
The cardboard logs I rolled yesterday were dry enough this morning to take down and toss into my box of "ready-to-shred" cardboard. One-day drying.
To stop the "unrolling" while drying I can take another hanger and use the "vee" end to pinch and hold the log rolled up.
Update, 20 March 2019:
The days go by. It's a week since my last update!
I'm gonna have to be prepared to cut new cardboard boxes into flats right away when I get em. And soak-and-roll the flats into cardboard logs. So that cardboard doesn't pile up in the garage. And go down to the projects room every day to toss my drip-dried logs into the storage box.
When the storage box is full, it's time to drag the shredder out of the shed and run my cardboard logs thru it. [EDIT: Now I have the shredder, I have a reason to pick up twigs and stuff off the lawn. I'm keeping em in a big cardboard box in the shed. Gotta coordinate collection of shredables. A week or more often passes before I have enough stuff to drag out the shredder.
//
I did get some burlap bags. Didn't do anything with them yet. Oh, and the paper towel and toilet paper rolls I started saving do seem to add up quickly!
Our recycle bin now gets maybe 1/4 full in a week, instead of full full.
Later, 20 March 2019:
Oh, this is gonna work!
We have a river birch tree. River birches are always in the process of shedding bark. It's an interesting looking tree. But not only is it always shedding bark; it is also always losing branches. Not big ones, little ones: foot-long twigs, two foot, three foot at most, eh, maybe four. Half inch diameter or less. Nothing big.
But come the end of winter there can be a good lot of twiglets on the ground: under the tree, and beyond the tree in whatever direction a stiff wind was blowing. I spent an hour picking em up this morning. I got done, I evaluated the situation:
- I got twigs
- I got cardboard logs
- I got a shredder
- I even got a burlap bag to catch the shreddings
- and a bungee cord.
Not bad!
Sometimes it pulls the cardboard in too fast and can't handle it, and it wants to stall. But I find this doesn't happen if I run the briggs at full throttle. It'll be good if I can remember that.
Saturday, January 5, 2019
Silicone Grease
For hose washers, o-rings, etc: Eley Silicone Grease. Comes in a tube.
I just used the CRC spray, which I got locally. The Eley link provides access to an MSDS sheet for their silicone grease. First impression, it appears much less harmful than the CRC spray.
Subscribe to:
Posts (Atom)